Hello, friends!
In this post I will show you how to do a simple and pretty cool horizontal navigation bar like this above and I’ll show you how to implement this using HTML5 and CSS3. I hope that you would like this. For the impatient here is the demo. So let me start!
Building of a new web project looks like to build a house. First you have to put the basis.
So first thing which I am doing is to write our HTML. The most important thing I am doing when I write the code is not to write simply HTML but semantic HTML. Because of this I am using a navigation (<nav>) tag. Between a navigation tag as with most modern navigation bars I use unordered list (<ul>). And how each unordered list this has some lists items (<li>) and inside them I put anchors (<a>) tags with “href” attribute, which includes the link’s destination. In this case I have hash mark “#” that tells the browser the link is on the current page. Also I am set and an image (<img/>) tags with “src” attribute which specifies the URL of an image.
So here is my sample semantic HTML code:
On the next image below you see how the navigation looks without any styles in browser. How you think is this beautiful?
I think no! So lets make it beautiful. I’ll do it in some steps.
Step 1
The first thing I do is to reset the distances and the clearances so that they to be the same in all browsers. Also I use “box-size” property which allows you to define certain elements to fit an area in certain way. Then in my body selector I set background colour of a page and font-family and font-size for whole text in the page.
Step 2
In this step I am going to show you how to style unordered list and lists items. I put for my unordered list “margin”, “margin-top” and “width” properties which put my <ul> in the middle of the page and 100px top margin and width 700px. For each list item I set “border-right” – sets border only on right side, “float: left” – makes the navigation horizontal or simply this places the element on the left and following content on the right and “list-style-type: none” – remove the bullets in front of every list item.
Step 3
Now it’s time to style anchor tags. I set for them background colour, colour for text, display – defines how a certain HTML element should be displayed in my case I say “block”, padding – spacing between the border and the content, text-decoration – set decoration for text and the last property is transition – effect that makes elements gradually to change from one style to another.
P.S. Transition is new property which is inconsistent with old browsers!
Also I inset and style for anchors which are hover. That means when the mouse is over it change style – in this case change the style of the background and colour of the text.
Step 4
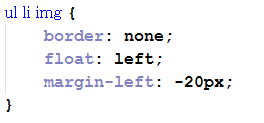
The last thing I am going to do is to style images. Here I remove borders of the images, set the elements on the left and set margin from the left side.
Conclusion
It has done! I already have completely ready and working navigation bar. I’ll be happy to comment and share with me what you think about it. You can ask me questions too, if you have. Bye for now! 🙂


